Saturday 23 February 2019

LANtest Cable Tester Review

As an IT enthusiast, I always find it favourable to invest in tools that can help me with the things that I do in the workplace. My job isn’t just limited to programming alone, it also involves other stuff that is related to my field of work. For example, I’m in charge of setting and the maintenance of the computer networks in the office, telephony and CCTV systems. Thus, it is always very handy to have some kind of tool in my toolbag that can make my life easier.

One of the tools that I have in my “toolbag,” as I call it, is a network lan tester called LANtest. It’s a Multi-Network modular cable tester that is capable of testing LAN cables, phone cables and coaxial cables.


I asked an Indonesian friend of mine named Harsya to buy this tool for me last year when I helped him set up our computer network in Daru Island. You can read about that in my other blog, http://pinoyinpng.blogspot.com/2018/05/a-short-work-in-daru-island.html. It fits snuggly in this black bag but the accessories that came with it made the bag look bulky.


The accessories included in the bag have 1 short end to end RJ45 cable, 1 short end to end RJ 11 cable, and a pair of COAX connectors with RJ45 connector at its each end. It also has a small manual that shows explanation of what those buttons and led lights are for.


This device has two parts: the main unit on the right, which is the bigger one and the remote unit on the left which is obviously the smaller. To test for cable mapping in a CAT5e/CAT6 UTP cable, one must need to plug the other end of the cable to the RJ45 port in the main unit and the other to the RJ45 port of the remote unit. It’s pretty straightforward to use, just slid the power switch to the ON position and you will see the led lights on both parts lighting up in succession. If any of the lights jumped from 1 to 3 for example, then the number 2 wire in the UTP cable is not properly crimped to RJ45 connector.


If you wish to test a CAT5 cable that isn’t laid out to the area yet, plug in the first RJ45 connector to left port. Remove the RJ11 adapter from the right port and plug the other end of the cable there. The led lights in the bottom and at the top should be in synchronized flow with one another. The big blue button is for manual scanning of pin-out indicator when the tester is in MANUAL mode (white button).


This is the top view of the main unit, both ports are actually RJ45 ports but each one can become an RJ11 port when inserted with an RJ11 adaptor. I just marked them with “OUT” and “LOOP”  just to show you where to put the RJ45 connectors when testing a cable without using the remote unit.


Here’s what the RJ11 adapter looks like. It’s easy to remove and replace back to the RJ45 port.


Here’s the included BNC connectors (both male and female).  This is very helpful for other projects like setting up CCTV cameras that use coaxial cables and BNC connectors.


When testing for coaxial cables, plug one of the BNC cable accessories to the remote and one to the main unit. Since COAX cables use only two wires, only the first (1) and the second (2) LED light of the 9 LED lights should light up in succession.  If one of the two led lights fails to illuminate, it means that the COAX wire isn’t properly soldered to the BNC connector. In this picture, I deliberately connected both of the BNC connectors just to show you how it’s done. But in actual work, you’ll connect each end of the COAX to these accessories.


Here’s the picture of when I actually used this tester in a real project. Notice the use of coaxial cables and CAT5e cables.


This tool is also very handy for testing the cable termination in a floor or wall port. It can test for wiring schemes of either T-568A and T-568B standards. For me, I always use the T-568A standard for all of my LAN cables.


Here's a crude testing device that I asked my IT staff to create. It's just a plain wood with nails and wires built to let us shuffle the wires in any way we like. He's holding the LANtest cable tester for me while I'm taking this photo. You'll see that the main unit is showing the number 7 LED light ON while it's 8 on the remote unit. This is because we deliberately switched the wires 7 and 8 on the other side of the connection just for us to see what happens if the wires are not in the proper pin-outs.


In this photo, I shorted the wire number 8 to wire number 3 on the remote side. We can see that the remote unit's number 3 and 8 LED are lighting up together while only the number 3 LED is lighting up on the main unit.


By the way, this tool uses one 9V battery (PP3 type). The weight of the battery will add up to the tool which is a good thing so the tester doesn't get moved too much by the tension of the cables being tested.

PROS and CONS.


PROS:
  • The LED lights are very bright.
  • The power switch and the two proprietary buttons are durable.
  • Can perform continuity test and wire mapping without using the remote unit.
  • The battery in the battery compartment fits in nicely and isn't loose.
  • The prints on the panels don't wear off easily.
  • Durable plastic casing and has a nice color combination.
  • Has auto and manual scanning of pin-out indicators. 
  • Long range testing. So far, I have done a testing for a 100-meter cable.

CONS:
  • No power saving mode. If you switch it ON and forget about it, the battery will drain out.
  • No dedicated BNC port and RJ11 port.

Well, that’s all I can say about the LANtest cable tester. It’s a lot better than the cheap LAN tester I bought from CDR King. It is tough and durable and you’ll get your money’s worth. Don’t even think twice about buying this tool because it’s a pretty cool thing to have.


Monday 19 June 2017

Choosing Between Char, Varchar and NVarChar Data Types

What is the best way to store a string data type into an SQL Server database? I’d probably decide not to influence your decision about choosing which one was the best among the three, but I’d demonstrate an example with which we could use to differentiate each data type from the rest.

In SQL Server, we can interchangeably use CHAR and VARCHAR or NVARCHAR to store a string value like ‘GLEN’ for example. Each of which will allocate the right space for it and the effect of how the data is stored is respective to each own.

For example, the CHAR data type can hold the string ‘GLEN’ and so does VARCHAR but these won’t tell you about the kind of strategy being used to save the word ‘GLEN’ into a field. So to give us a bird’s eye view of how the SQL Server stores data on each data type, here are the basic differences between the three:

CHAR
Data is padded with blanks to fill the entire field size. For instance, if one creates a CHAR(20) field to store a string with 4 characters only,  the system will pad it with additional 16 blanks to fill in the unused storage space being allocated. This data type requires 1 byte of storage and can store up to 8000 characters.

VARCHAR
Unlike the CHAR data type, if one creates the field of the same length, e.g. VARCHAR(20), the system will store the actual value of the string ‘GLEN’ and will not pad it with extra blanks. Using this data type will actually save us an extra space in the long run. Like CHAR, this requires 1 byte of storage and can store up to 8000 characters.

NVARCHAR
Like the VARCHAR data type, this will also store the actual value of the string and does not pad the unused allocated characters with blanks. The advantage of using NVARCHAR over the two counterparts is that it supports both Unicode and Non-Unicode Data Types. As opposed to VARCHAR, this requires 2 bytes of storage and can only store up to 4000 characters.


Difference between Unicode and Non-Unicode Data Types


An example of Non-Unicode data types is the US English characters. Data types that use 1 byte to encode each character can only represent 256 different characters. The client tools like ADO.Net, uses the collation of Non-Unicode data as a hint to choose the code page of the data, like 1252 for Latin1 (ANSI) as an example.

With Unicode, however, the client does not need to interpret the data according to a code page, because the data itself is already multi-byte and the client will just interpret it according to the UCS-2 encoding which is the actual Unicode style preferred by SQL Server.

SQL Server Example


In this example, we have created a table with three fields of different data types: CHAR, VARCHAR and NVARCHAR. We then filled it in with similar values, and for this case, it’s my name, GLEN.


To easily find out how much storage space our strings have taken up, I have used the function DATALENGTH(). The result shows the spaces the three data types have used up respectively.

CHAR = 20 bytes
VARCHAR = 4 bytes
NVARCHAR = 8 bytes

Notice that NVARCHAR uses 2 bytes of storage for each characters. It can be said that using NVARCHAR is not a wise choice because the additional byte isn’t necessary if the system we’re creating is exclusively using the US English language only. However, if the program you wish to create requires support for at least one foreign language, like the Korean Hangul or the Japanese Kanji for instance, then using NVARCHAR data type is the way to go.


Tuesday 9 May 2017

Configuring PhpMyAdmin to Connect to MariaDB

Assuming that you have a webserver, a running PhpMyAdmin connected to a locally installed MySQL and a newly installed MariaDB in your local server, we can easily set MariaDB as the default database server for PhpMyAdmin. Aside from that assumption, what we're also guessing here is that you have the necessary rights to access the virtual directory or the webroot of your local webserver where your copy of PhpMyAdmin folder is installed.

Anyway, here’s how I did it.

1. In the PHPMYADMIN folder, copy the file config.sample.inc.php to a new file config.inc.php.
2. Open the file config.inc.php in any text editor. Look for the following lines:

/* Server parameters */
$cfg['Servers'][$i]['host'] = 'localhost';
$cfg['Servers'][$i]['connect_type'] = 'tcp';
$cfg['Servers'][$i]['compress'] = false;

3. Notice that the default value for the “host” field is localhost.  By right, as I’ve said in the beginning, PhpMyAdmin referring to localhost as its server for database will connect to MySQL. And by some standards, the port rightfully assigned to MySQL Server is port 3306. For MariaDB, I set it to use the port 3308, so what we’re gonna do is attach that port number to the string needed by the host field so PhpMyAdmin should connect to MariaDB instead.

/* Server parameters */
$cfg['Servers'][$i]['host'] = 'localhost:3308';
$cfg['Servers'][$i]['connect_type'] = 'tcp';
$cfg['Servers'][$i]['compress'] = false;

4. Leave the tcp as the standard connection type.


Here’s what PhpMyAdmin connected to MariaDB should somehow look like in your end. Now, the real question is, why the need to use PhpMyAdmin when one can be better off with some desktop SQL Managers like HeidiSQL?

The whole point of doing this is not to replace your current SQL Manager with PhpMyAdmin but to augment it. What I mean by that is, it's almost not possible to be at your own desk all the time. Sometimes, you’ll have to work on another computer in your company. What PhpMyAdmin can do is to let you access your database in the browser in any computer in your local network and do your thing right there especially in times of urgency. Otherwise, you’ll just have to walk back to your desk and use HeidiSQL that is installed in your office PC.

That’s all for this post. Have a nice day everyone!

Tuesday 25 April 2017

Boolean Field in Visual Foxpro and MS SQL Server

In Visual Foxpro 9 (VFP) and it’s lower versions, there exists a logical field with which a programmer can use to have some kind of a digital flip-type switch that we regularly use in queries or in a control, like a checkbox, for example. If one can imagine how a light switch works, the idea behind is the same with that of a logical field. The apparent difference emerging from that point being, is that the usual ON and OFF status that we regularly see on a common household light switch is omitted, the logical field in VFP uses a boolean value of either .T. or .F. instead, with “.T.” representing the value for TRUE and “.F.” for FALSE.

So it’s kind of like when your dad asks you if you have left the garage lights on overnight, you may probably hear, “Is it TRUE that you have left the lights on last night?”

Anyway, Creating a logical field in a VFP cursor is as simple as this.

Create Cursor curTest (field1 l)

Select curTest
MODIFY STRUCTURE


But in MS SQL Server, with versions like 2008 or 2012, there is no Boolean or Logical field type. This is probably the reason why I see many software developers turning their trust to characters and integer types just to work around this inadequacy. 

For instance, a programmer can use several of the INT (integers) type field just to represent a value of 0 or 1. Because 0 and 1 can both respectively represent the ON and OFF nature of a basic switch. The idea makes sense until you add another value, like “2” then it loses the foremost characteristic of being a “flip-type” switch. 

The Workarounds in SQL Server


I’ve seen programmers use the int type, which has a range of -2^31 (-2,147,483,648) to  2^31-1 (2,147,483,647) and can take up storage of 4 Bytes in the table. Others use the smallint type, of which range is shorter than the int type but takes up 2 Bytes of storage space. There is also the tinyint that has a range of only 0 to 255 and takes up one Byte of storage space.

One thing to consider when you are feeling a bit determined to use these INT types for a simple switch is that each column of int created in a table will take up the storage space that I mentioned above. For example, if you have two columns of a tinyint field, each column will respectively take up one Byte of storage in a table.

At the other end of the spectrum, there are also those who use a character field to represent a switch in a similar fashion. These programmers, like I do in the early stages of my programming career, have liked the idea of using CHAR(1) type field to mimic the purpose of a logical field. The reason being is that it’s a straightforward solution and it’s easy to read. All that one needs to do is update the char field with a string having a value of “T” or an “F” character. 

The downside of using a char(1) field, however, is that it can take up other characters as well like “A” for instance, aside from the “T” or “F” characters. Also, each char(1) type column’s value in a table will take up 1 Byte of storage. Therefore, if you have two of this column in your table, the values will take up 2 Bytes and so on.

What I Think Is the Right Way to Do It


The best thing to do, in my humble opinion, is to use a bit type field in MS SQL Server. This type accepts integer data type like a bit value of 1 or 0, and it can have a NULL value as well.  

In this example, I’ve created a temporary table with a bit type field. I then inserted a 1 value.

If (Select name from sys.tables where name like '%#testTable%'is not null
      Begin
            drop table #testTable;

            create table #testTable (field1 bit);
     
            insert into #testTable (field1values (1);
           
            select field1 from #testTable;     
      End

The advantage of the bit type is that it can automatically convert the string values TRUE and FALSE to bit values.  The “TRUE” becomes 1 and “FALSE” becomes 0.

If (Select name from sys.tables where name like '%#testTable%') is not null
      Begin
            drop table #testTable;

            create table #testTable (field1 bit);
     
            insert into #testTable (field1) values ('TRUE');
           
            select field1 from #testTable;     
      End

Sending Updates from Visual Foxpro


Luckily, MS SQL Server will convert the boolean value sent from Visual Foxpro by way of SQL-Pass Through or (SPT) connection.  

For this example, I have a table that I use for keeping LEAVE PAYS. It has a bit type column named isLeapYear. Let’s see what’s in it.


Notice that all other values in the isLeapYear column has zero values except for what’s in the fourth row, which has a bit value of 1.

Now, let’s try and change that into 0 (zero) by sending an UPDATE from Visual Foxpro with this command.

=SQLExec(oHandle.nHandle,'Update MyDatabase.dbo.MyTAble Set isLeapYear = .F.')


Now, we can see that all of the values in the isLeapYear column became zeros. 

Showing the Results with a Checkbox Control in a Grid


Let’s change the value of the fifth column, in the first row to 1. Then we’ll pull the records from MS SQL Server to a Visual Foxpro Grid that has a checkbox column.

=SQLExec(oHandle.nHandle,'Update MyDatabase.dbo.MyTAble Set isLeapYear = .F. where lpID = 9')


 So, this is how it should look like now. 


After we pulled the records from SQL Server, this is what a grid with a checkbox control would look like. Notice that the checkbox is automatically ticked because the underlying value in that column is .T. while the rest have .F. values. I will discuss how I created this checkbox in a grid  on a new post once I get a free time again.

Final Thoughts


Visual Foxpro is somehow lucky to have found its Logical values automatically converted by MS SQL Server to bit values. 

But another point worth considering for using a bit type field is that the SQL Server Database Engine optimizes storage of bit columns.  For example, if a table has less than 8 bit columns, all of the columns are stored as 1 byte. Having more than 8 bit columns but less than 16 will be stored as 2 bytes and so on.

As opposed to using an int type that always stores 1 byte or more per column, this is a great way to conserve server storage space if one is too concern about data normalization and storage conservation. 

Have a nice day!

Monday 13 March 2017

CinchPro Payroll System


Right now, I'm working on a payroll system I named CinchPro Payroll System. This will be used as a separate payroll system or in conjunction with Tangosoft Biometric Attendance Software. The software fits Papua New Guinea's payroll procedures including tax deductions.

CinchPro comes from the word cinch, which means "easy" and pro as professional. The program aims to simplify payroll processing by removing much of the hassle and let the system work things out for you.

Tuesday 27 December 2016

Price Maintenance

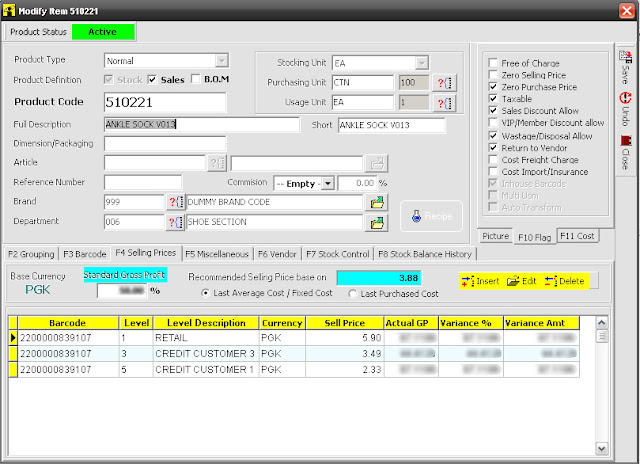
The Price Maintenance module in tanGoSoft allows updating of the prices level 3 and 5 in ICE. The ICE system can wonderfully create more than 1 type of price to serve different purposes. For example, in the company that I am currently employed, the price level 1 stands for retail and level 3 for wholesale.

This is the form that is used to modify the product in ICE Inventory System. As we can see, there are three levels at the moment. The way this is designed is so lovely and I really love it. The only thing of concern here is that when we make a purchase and receive that to ICE, the new prices based on the last purchase cost will have to be manually updated by the user.

Usually, an ICE user will have to go through each item recently purchased and manually update the price in the module above. In the company that I am currently employed, the user will get the hint from the GP calculator that comes together with the ICE's Goods Receiving module. The GP will be negative if the price of the item being received is outdated.


To avoid having to go through all the items individually and to make sure that all items recently received will have the correct selling prices, the company that I am working with has requested me to create a module that can perform a price update of any given level. Hence, I created the Price Maintenance above to do the job.

In the Price Maintenance, the user will have the ability to select which items under a certain invoice will have the prices updated. It also has the option to create new price level if they are not created in the first place. It also has the rollback option if the user has mistakenly updated the wrong items.


Note:
If you are utilizing ICE Inventory software in your company and you wish to know more about tanGosoft, you may send your inquiry to software@glenvillar.com.

Wednesday 21 December 2016

The TanGosoft

TANGOSOFT is a supplementary program that I developed for a shop that is using ICE (Inventory Control Expert) Inventory. The purpose of which, is to address the few shortcomings of the ICE system and make it rather easier to accomplish certain tasks that is difficult or probably impossible to achieve with ICE alone.

The ICE System is a matured system and a pretty impressive inventory system made by EASI. However, I've been administering ICE System in the current company that I am employed with for more than 5 years now and I can say that I have grown pretty much familiar with it to know which things it is best at or is in need of improvement.

But any improvement in ICE itself would mean that the makers of ICE should modify the original source code. I believe that any modification may spell "additional fees" because as I've said, ICE is a matured system and have addressed much of what an inventory system needs.


This is the LOGIN page for tanGosoft. Its current version supports two companies, the Tango which uses ICE systeam and TWS which does not, and only uses tanGosoft programs. 

I've originally developed tanGosoft to initially help me with my stocktake routines. But as times went by, I had put in more functionalities that I deemed necessary for either speeding things up or just making things possible.


Tangosoft for ICE Inventory - Through The SQL
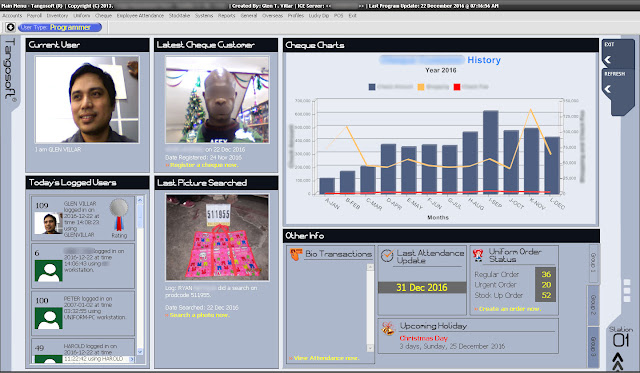
This is the main deck for tanGosoft. It displays the current user, the other logged users, the latest Cheque-rediscounting client, some history, the last item photo searched and some other relevant stuffs.


This is the main deck for the ICE Inventory System. Again, the ICE software is a matured and a wonderful inventory program which I admired for its simplicity and able to handle small to large shop operations. But I can say that using ICE together with tanGosoft is still fulfilling than just the ICE alone.

Here in Papua New Guinea, I have seen numerous shops that are using the ICE POS and ICE System to handle both the wholesale and retail sales.


Note:
If you are utilizing ICE Inventory software in your company and you wish to know more about tanGosoft, you may send your inquiry to software@glenvillar.com.
Related Posts Plugin for WordPress, Blogger...