Tuesday 27 December 2016

Price Maintenance

The Price Maintenance module in tanGoSoft allows updating of the prices level 3 and 5 in ICE. The ICE system can wonderfully create more than 1 type of price to serve different purposes. For example, in the company that I am currently employed, the price level 1 stands for retail and level 3 for wholesale.

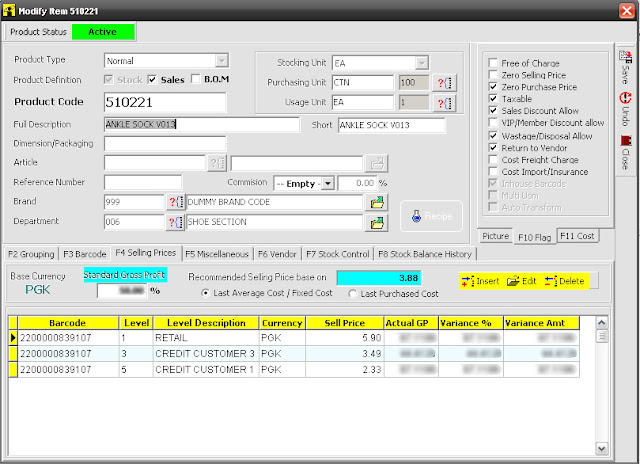
This is the form that is used to modify the product in ICE Inventory System. As we can see, there are three levels at the moment. The way this is designed is so lovely and I really love it. The only thing of concern here is that when we make a purchase and receive that to ICE, the new prices based on the last purchase cost will have to be manually updated by the user.

Usually, an ICE user will have to go through each item recently purchased and manually update the price in the module above. In the company that I am currently employed, the user will get the hint from the GP calculator that comes together with the ICE's Goods Receiving module. The GP will be negative if the price of the item being received is outdated.


To avoid having to go through all the items individually and to make sure that all items recently received will have the correct selling prices, the company that I am working with has requested me to create a module that can perform a price update of any given level. Hence, I created the Price Maintenance above to do the job.

In the Price Maintenance, the user will have the ability to select which items under a certain invoice will have the prices updated. It also has the option to create new price level if they are not created in the first place. It also has the rollback option if the user has mistakenly updated the wrong items.


Note:
If you are utilizing ICE Inventory software in your company and you wish to know more about tanGosoft, you may send your inquiry to software@glenvillar.com.

Wednesday 21 December 2016

The TanGosoft

TANGOSOFT is a supplementary program that I developed for a shop that is using ICE (Inventory Control Expert) Inventory. The purpose of which, is to address the few shortcomings of the ICE system and make it rather easier to accomplish certain tasks that is difficult or probably impossible to achieve with ICE alone.

The ICE System is a matured system and a pretty impressive inventory system made by EASI. However, I've been administering ICE System in the current company that I am employed with for more than 5 years now and I can say that I have grown pretty much familiar with it to know which things it is best at or is in need of improvement.

But any improvement in ICE itself would mean that the makers of ICE should modify the original source code. I believe that any modification may spell "additional fees" because as I've said, ICE is a matured system and have addressed much of what an inventory system needs.


This is the LOGIN page for tanGosoft. Its current version supports two companies, the Tango which uses ICE systeam and TWS which does not, and only uses tanGosoft programs. 

I've originally developed tanGosoft to initially help me with my stocktake routines. But as times went by, I had put in more functionalities that I deemed necessary for either speeding things up or just making things possible.


Tangosoft for ICE Inventory - Through The SQL
This is the main deck for tanGosoft. It displays the current user, the other logged users, the latest Cheque-rediscounting client, some history, the last item photo searched and some other relevant stuffs.


This is the main deck for the ICE Inventory System. Again, the ICE software is a matured and a wonderful inventory program which I admired for its simplicity and able to handle small to large shop operations. But I can say that using ICE together with tanGosoft is still fulfilling than just the ICE alone.

Here in Papua New Guinea, I have seen numerous shops that are using the ICE POS and ICE System to handle both the wholesale and retail sales.


Note:
If you are utilizing ICE Inventory software in your company and you wish to know more about tanGosoft, you may send your inquiry to software@glenvillar.com.

Thursday 24 November 2016

How To Convert Number To Words In Visual Foxpro 9.0

I created these funtions a long time ago, but I believe that there are still a number of software developers out there who are using VFP as their primary or secondary programming language.

To use this, save all these codes in a singe PRG file. To call the function anywhere in your VFP program, use this syntax (please do not use commas):

? NumToWord(12437.95)

****************************************
* Demo on converting number to words
* Primary usage: Philippine Local Checks
* Author: Glen T. Villar
* Date Created: January 13, 2009
* Code Updated: 12 April 2019
*****************************************

Function NumToWord(Par1 As Long)
 If Mod(Par1,1) > 0
  m.lcNewItem = FixItUp(Par1)+' Dollar and '+FixItUp(VAL(RIGHT(TRANSFORM(Par1,"9999999999999999999.99"),2)))+' Cents'
 Else
  m.lcNewItem = FixItUp(Par1)+' Dollar'
 Endif
 Return (m.lcNewItem)
Endfunc

Function FixItUp(Param1 As Long)
 ****************************************
 *  Author: Glen T. Villar
 *  Function for Converting Number to Words
 *  Primary usage: Philippine Local Checks
 *  Secondary usage: American Local Checks
 *  Date Created: January 13, 2009
 *  Date Modified: August 8, 2009
 *  Date Modified: April 12, 2019  
 *****************************************
 If !Empty(Param1)
  Dimension lArray[6]
  Local lcAnswer, nReiterate, lnLeftSide, lcWord, lcConcatenate, ;
   lnMove, lcTaken, lcWordsExt
  If !Empty(Param1)
   lcLeftPart = Alltrim(Transform(Int(Param1)))
   lnLeftSide = Len(m.lcLeftPart)
   nReiterate = 0
   For lnVar = 1 To Int(m.lnLeftSide/3)
    lnLeftSide = lnLeftSide - 3
    nReiterate = nReiterate + 1
   Endfor

   lcOnes = '1One,2Two,3Three,4Four,5Five,6Six,7Seven,8Eight,9Nine,'
   lcTees = '10Ten,11Eleven,12Twelve,13Thirteen,14Fourteen,15Fifteen,16Sixteen,17Seventeen,18Eighteen,19Nineteen,'
   lcTens = '2Twenty,3Thirty,4Forty,5Fifty,6Sixty,7Seventy,8Eighty,9Ninety,'
   lcTitle = '2Thousand,3Million,4Billion,5Thrillion,6Quadrillion,'

   lnMove = m.nReiterate * 3
   lcParam = Alltrim(Right(m.lcLeftPart,m.lnMove))
   lcClassify = ''
   lcClassify = Iif(Between(Mod(Val(Alltrim(Left(m.lcLeftPart,m.lnLeftSide)))/100,1) * 100,1,9), Strextract(m.lcOnes,Alltrim(Left(m.lcLeftPart,m.lnLeftSide)),','), ;
    IIF(Between(Mod(Val(Alltrim(Left(m.lcLeftPart,m.lnLeftSide)))/100,1) * 100,10,19), Strextract(m.lcTees,Alltrim(Left(m.lcLeftPart,m.lnLeftSide)),','), ;
    IIF(Between(Mod(Val(Alltrim(Left(m.lcLeftPart,m.lnLeftSide)))/100,1) * 100,20,99), Strextract(m.lcTens,Alltrim(Left(m.lcLeftPart,1)),',')+Space(1)+ ;
    Strextract(m.lcOnes,Alltrim(Substr(m.lcLeftPart,2,1)),','),'')))

   For lnVar = 1 To m.nReiterate
    lnMove = m.lnMove-3
    lcTaken = Substr(lcParam,m.lnMove+1,3)

    If Mod((Val(m.lcTaken)/100),1) * 100 > 19
     lcConcatenate = Strextract(m.lcOnes,Alltrim(Left(m.lcTaken,1)),',')+Iif(Alltrim(Left(m.lcTaken,1))<>'0',' Hundred ','')+ ;
      Strextract(m.lcTens,Alltrim(Substr(m.lcTaken,2,1)),',')+Space(1)+Strextract(m.lcOnes,Alltrim(Right(m.lcTaken,1)),',')
    Else
     lcConcatenate = Strextract(m.lcOnes,Alltrim(Left(m.lcTaken,1)),',')+ Iif(Alltrim(Left(m.lcTaken,1))<>'0',' Hundred ','')+;
      Strextract(m.lcTees,Alltrim(Substr(m.lcTaken,2,2)),',')+Iif(Mod(Val(m.lcTaken)/100,1) * 100 < 11,Strextract(m.lcOnes,Alltrim(Right(m.lcTaken,1)),','),;
      Strextract(m.lcTens,Alltrim(Substr(m.lcTaken,2,2)),','))
    Endif
    lArray[lnVar] = m.lcConcatenate + Space(1) + Strextract(m.lcTitle,Alltrim(Str(m.lnVar)),',')
   Endfor

   lcWordsExt = ''
   For nVal = m.nReiterate To 1 Step -1
    lcWordsExt = lcWordsExt + Space(1) + ;
     Iif(Getwordcount(lArray[nVal])=1 And Inlist(Upper(Alltrim(lArray[nVal])),'THOUSAND','MILLION'),'',lArray[nVal])
   Endfor

   lcNewWord = ''
   lcNewWord = m.lcClassify + Space(1)+;
    IIF(!Empty(m.lcClassify),Alltrim(Right(Getwordnum(m.lcTitle,m.nReiterate,','),Len(Getwordnum(m.lcTitle,m.nReiterate,','))-1)),'');
    +Space(1)+;
    Alltrim(m.lcWordsExt)

   Return Alltrim(m.lcNewWord)
  Endif
 Else
  Return ''
 Endif
Endfunc

Friday 21 October 2016

Connecting from C#.Net to SQL Server Like VFP's SQL Pass Through

Through The SQL By Glen Villar
If one wants to manipulate an SQL Server Database from C#.Net over a local area network in a similar manner that we do in Visual Foxpro through SQL Pass Through, it may not hurt to consider a simple technique that I use to achieve that.

Our friendly neighbourhood Samir Ibrahim from Lebanon has demonstrated to me a different approach using datasets via Ado.Net in a disconnected fashion which is interesting as well. But for this post, I will only demonstrate my approach first and I hope to discuss Samir’s approach in my future posts.

To make things easier and our server name changeable, we will write our connection string to a configuration file that comes along with a C# project.  The following is an example of a connection string added to a configuration file.  The filename is usually the project name plus a suffix.

For example, mine is MyProject.vshost.exe.config which is usually found in \YourProject\bin\Debug folder.

The Configuration File


<?xml version="1.0" encoding="utf-8" ?>

<configuration>
  <connectionStrings>
    <add name="MyConfigString" connectionString="server=MyServer;database=MyDatabase;user id=MyID;password=MyPassword;integrated security=false;connection timeout=30" />
  </connectionStrings>
</configuration>

The Database Connection Class


To make the connection handle available for calling in all forms, I suggest that we create a class that handles and stores that connection. We'll shall name the connection string MyConfigString.

using System.Data;
using System.Data.SqlClient;
using System.Configuration;
namespace MyProject
{
    class DatabaseClass
    {
        static string connectionString = System.Configuration.ConfigurationManager.ConnectionStrings["MyConfigString"].ConnectionString;
        public static SqlConnection myConnection = new SqlConnection(connectionString);   
       
        public DatabaseClass()
        {}
    }
}

Extracting Records and Displaying


In one of your forms, you may want to show records extracted from a table to a specific control, say, a ListView control for example. The following codes below show how it is done.We'll pass along a parameterized SQL query through the SQLCommand. 

Our connection handle in this example will be DatabaseClass.MyConnection

SqlParameter Par1 = new SqlParameter("@Param1", SqlDbType.Varchar, 20);
      Par1.Value = "000000121";

SqlDataReader DR = Null;
      String lcQueries = "";

lcQueries = @"Select t1.Field1, t1.Field1, t2.Field3,
From MyDatabase.dbo.MyTable T1
Where T1.Field1 = @Param1";

SqlCommand SqlCommand = new SqlCommand(lcQueries, DatabaseClass.myConnection);
      SqlCommand.Parameters.Add(Par1);

lvMyListView.Items.Clear();
      DR = SqlCommand.ExecuteReader();
      while (DR.Read())
{
ListViewItem List = new ListViewItem(DR["Field1"].ToString());
      list.SubItems.Add(DR["Field2"].ToString());
      list.SubItems.Add(DR["Field3"].ToString());
      lvMyListView.Items.AddRange(new ListViewItem[] { List });
      }
DR.Close();

Basically, what we did was to extract records from an SQL Server database using the command SQLCommand, reiterated through the extracted records and added each record to our list view control.


Hope this helps.

Saturday 4 June 2016

UNDEFINED FUNCTION MB_DETECT_ENCODING()

If you're seeing this problem in your browser after trying to do a new set up of phpMyAdmin to Windows 7 IIS...

PHP Fatal error:  Uncaught Error: Call to undefined function mb_detect_encoding() in C:\inetpub\wwwroot\phpmyadmin46\libraries\php-gettext\gettext.inc:177

Stack trace:
#0 C:\inetpub\wwwroot\phpmyadmin46\libraries\php-gettext\gettext.inc(282): _encode('The %s extensio...')
#1 C:\inetpub\wwwroot\phpmyadmin46\libraries\php-gettext\gettext.inc(289): _gettext('The %s extensio...')
#2 C:\inetpub\wwwroot\phpmyadmin46\libraries\core.lib.php(306): __('The %s extensio...')
#3 C:\inetpub\wwwroot\phpmyadmin46\libraries\core.lib.php(957): PMA_warnMissingExtension('mbstring', true)
#4 C:\inetpub\wwwroot\phpmyadmin46\libraries\common.inc.php(102): PMA_checkExtensions()
#5 C:\inetpub\wwwroot\phpmyadmin46\setup\lib\common.inc.php(22): require_once('C:\\inetpub\\wwwr...')
#6 C:\inetpub\wwwroot\phpmyadmin46\setup\index.php(13): require('C:\\inetpub\\wwwr...')
#7 {main}
  thrown in C:\inetpub\wwwroot\phpmyadmin46\libraries\php-gettext\gettext.inc on line 177

... this solution can help you.


1. Open php.ini in your PHP folder.

2. Find the extension below and uncomment (remove the ;)
    
   ;extension=php_mbstring.dll ---->  change this to extension=php_mbstring.dll
3. If you want, although not necessary, you can default the mbstring language setting to English. Just find the mbstring.language = and change it to mbstring.language = English.


Thursday 28 April 2016

Mouse Moves On Its Own Problem


There are various reasons as to why a mouse cursor just moves by itself.  One can just suspect a computer infestation as the reason but that can be possibly ruled out by going through the following questions:
  1. Does my pc have an anti-virus?
  2. Is the virus definition updated?
If you’ve answered yes to both questions, then your computer is okay unless the virus is new. To check if the problem is coming from something else,  you can also try and replace your mouse with a new one. If the problem persists then you can still keep that old mouse.

Another way to fix this is to try and uninstall and reinstall the mouse driver and see if it clears up the problem. A corrupted driver can sometimes mess things out.

To uninstall and reinstall the mouse driver, do the following steps:  (The example below is made using Windows XP OS. Win7, 8 and 10 have similar entries in Device manager anyway.)

Let’s assume you’re using a USB mouse. Unplug it and use the keyboard (shortcuts) to navigate to everything. 

Note: Since your mouse is not working during this time, you'll have to rely on the keyboard alone. We can simulate basic mouse movements by pressing the TAB key, for instance, to move through folders and files; the Menu Key for Right+Click and Enter key for double click. So when I say, Right+Click, you actually have to press the Menu Key which is situated in between the Alt key and Ctrl Key.

Right click on My Computer and select Properties. Once the System Properties is up, click on the Hardware tab and click on Device Manager.


Find the Mice and other pointing devices. Expand on the node to see the installed driver. In this case, mine’s  HID-compliant mouse.


Now, right+click on it and select uninstall.


Plug the mouse again. The mouse should be working fine again. 90% of the time, this works for me. 


Another Reason for Mouse Moving On Its Own


Sometimes, the mouse can also have a faulty cable. The fault can be unnoticeable but can prompt the computer to install a newer but exactly the same driver for your mouse causing it to conflict with the old driver. This may result to, say, an intermittent shaky mouse cursor.

When that happens, you'll see something like this in the device manager when you access it.


To fix that shaky mouse problem, right+click on one of the two drivers and disable it, leave the other one alone.


A disabled driver will have a red X mark on its icon.  This action may instantly get rid of that pesky unwanted mouse moving. Hope this helps. 


Friday 15 April 2016

How To Enable Intellisense In SQL Server Management Studio 2008 R2


The intellisense is a feature in SQL Server Management Studio 2008 R2 (SSMS) that assists T-SQL developers to easily know the underlying tables or fields of a database when typing codes from within the query editor.  Functions and variables may also popup as soon as you begin typing one or the first two letters of the keyword.

Some may find it weird that even after having  SSMS configured to enable this feature, it just won't work. My best guess is that their SSMS isn't upgraded to SP3 yet. To upgrade the SSMS 2008 R2 to SP3, please visit this download link and choose the appropriate platform for you.

Once installed, restart your SSMS and check for the following settings. Go to TOOLS menu and select OPTIONS.

This section is under Transact-SQL. The checkbox for "Enable IntelliSense" should be ticked.

By this time, the intellisense should kick-in. If not, please check if "IntelliSense Enabled" is clicked  under the Query menu. The icon is sunken if it is enabled.


Lastly, try to refresh the IntelliSense local cache by pressing Ctrl+Shrft+R while in the query editor. I hope that you were able to get your IntelliSense working.

Until next time! 

Friday 8 April 2016

How To Select All Nodes In Treeview In VFP 9.0


A more appropriate title of this article should have been  "How To Check All Child Nodes From a Parent Node In Treeview" but since I used a treeview control that contained only one parent node with multiple child nodes within, I guess I'd stick with the current title.

Here's one way I achieve the effect. But before I show the code behind, take note of the underlying table records where the treeview gets its record from.


The parent node has a "02_" string as a key as shown from the highlighted row in the image above. All the child nodes have different keys but have the same parent, a "02_" text that is used as a pointer to their parent node.

In the Treeview's .NodeCheck event, I wrote the following codes.

*** ActiveX Control Event ***
Lparameters Node
If Node.Key <> '02_'
      Return
Endif

For Each oNode In Thisform.oletreeView.Nodes
      oNode.Checked = Iif(Node.Checked,.F.,.T.)
Endfor

You can see that I added a checking routine to know if the user is ticking on the parent node or the child node. If the user has checked any of the child node, it will stop from there and will not proceed to executing the next codes, hence the "Return" keyword.

Next, I reiterate through all the treeview's nodes and set each node's checked property to either TRUE or FALSE depending on the parent's current "checked " status. If the parent's checkbox is unticked, the current child node in focus during which is set to checked; otherwise, it is unchecked.

Here's the result of which.


Related Posts Plugin for WordPress, Blogger...